Sunday, January 20, 2013

Sewing Sunday: Happy Boots

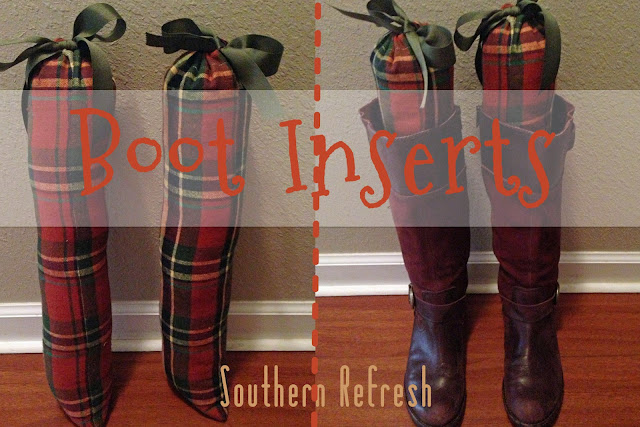
Happy Sunday and welcome to the 2nd installment of Sewing Sundays! Fall has come and gone and winter is officially here!  With this cooler weather I have been wearing my boots in full force: riding boots, dressy boots, cowboy boots, bean boots...you name it!  To help store my boots and maintain their shape, I started looking for boot inserts.  After searching Pinterest I found people used pool noodles and old magazines to support their boots. The ideas were clever, but not so cute! So I decided make my own :) They were simple, fast, and turned out perfect!  Here is to no more sad, frumpy boots:

Here is what you will need:

Scissors
Measuring tape
Pins
Fabric
Ribbon
Matching Thread
(You probably have everything you need on hand)
Step 1: Measure a rectangle, mine rectangle was 22x11. My boots are approximately 16 inches tall from where my heal sits to the top of my boot.  I also added a few inches because I wanted the boots inserts to show, this is your preference. You will also need to allow 2 inches where the ribbon will be inserted and a half inch inseam. In total the length of my material was 22 inches:

16 inch tall boots+ 2 inch ribbon allowance+ 1/2 inch seam allowance+ about 3.5 inches showing. 

For the width of the insert I measured around my own ankle and added a few inches so the insert would fit snug. My final width was 11 inches including a 1/2 inch seam allowance. 

Final material measurement: 22 inches by 11 inches. And you will obviously need 2 cuts of this measurement (1 for each boot).


Step 2: Fold down the top of your fabric one inch (see the left picture) and pin. If the "wrong" side (or back of your fabric) is facing up, fold and pin towards you (my material was reversible, so it did not matter for me).  We want all of the ugly seams on the back of the fabric. This fold will be where the ribbon will be inserted. Sew a straight line across from one end to the other. 

Next, fold the rectangle so the two long edges meet with the "right" sides together, the "right" side is the side you want to be visible when your project is finished. Sew down the long edges with a 1/2 inch seem allowance. Rotate the material and then continue to sew the bottom of the fabric, finishing with a few backstitches. At this point you should have an inside-out tube with a clean opening at the top.

Step 3: Now for the fun! Flip your tube so the finished side is now visible and stuff it with your filling. Make sure to stuff it tightly so your boot insert is strong. 

Step 4: Your last step is to run the ribbon through the top seam you created in Step 1. Just as you would thread a drawstring, pin a safety pin to the ribbon and guide it through the hole. Pull the ribbon ends together and tie a bow! I chose to do a drawstring so the stuffing could be easily removed or replaced and the insert could be washed, you don't want stinky boot inserts. You could also add deodorizers in the stuffing if you have stinky feet ;) . 

I hope this tutorial was informative and you are able to make your own cute inserts! It was pretty easy to figure out and can easily be adjusted to fit any pair of boots. Let me know how your project goes! Here is to no more sad, frumpy boots!

With Love, 
Katie M. 


Thursday, January 17, 2013

Replenish:

Just a quick note to replenish your soul and help finish the week strong! 

With Love, 
Katie M.

Wednesday, January 16, 2013

Explore Home:


It was an unusually warm and beautiful Saturday this past weekend in Tallahassee and Phillip and I took full advantage of it. Phillip and I both have desk jobs, so any opportunity to be outside - we take it. 

We decided to explore Mclay Gardens, a State Park, located in our area. It is a natural gem with biking/walking/riding trials, wildlife, and a lake. We did the 3 mile loop around the lake and ate lunch at the park, it was great exercise and such an enjoyable afternoon date!


While both Phillip and I have lived in Tallahassee for awhile now, we have never taken advantage of the State Park's natural habitat (even many of my local friends mentioned they haven't explored the trails of Mclay). It got me thinking about everything our area has to offer, and how we get stuck in a routine for dates and weekend plans. It's like growing up at the beach, you forget you live in paradise  (now that I have moved away, I only dream of that luxury). Like they say, "you never know what you have until it's gone"! So my goal is to enjoy Tallahassee and all it has to offer and I encourage everyone to find those hidden gems in your area! Just get out and explore.


Some Places to Explore at Home:

1. Museums - they are always changing! You go to museums on vacation, so why not at home too?

2. Local restaurants - support local shops!

3. Your Capital - I haven't been since 4th grade and I drive by it almost every day!

4. Parks - try recreational parks or state parks 

5. Your backyard - who knows what's back there!

6. Small towns in your area - we love the small towns surrounding our area, they are quaint and offer a quick "get-away",  new shops, and lots to explore.

So break out of your routine and try something new in your area! 


With Love, 
Katie M. 


Here are a few more pictures from our local adventure:


The Wildlife:
Red bird! (Blow a kiss, Make a wish!)

Ok so we didn't see any gators, but we did see a lot of squirrels!

Sunday, January 13, 2013

Sewing Sunday:


I have recently become interested in sewing.  My mom has sewn for many years and I have finally decided to learn the skill for myself.  When I was young my mom made me dresses and Halloween costumes, and as I grew up those costume request turned into new pillow shams and curtain projects. Now that I have my own house, the list of possible sewing projects is endless! Time to learn for myself.

I always wonder how people learn to sew,whether by classes, family tradition, or by simple trial and error. I will be doing a mix of the listed, but mostly trial and error with a lot of calls to my mom.  I have decided to dedicate some Sunday posts to new projects I am attempting...whether they be good or bad. 

My first project was an infinity scarf; I have to say it turned out great! I chose a simple black material so my seams wouldn't matter if they didn't line up.  I found a tutorial via Pinterest (at Shrimp Salad Circus); the tutorial was very helpful with great pictures and directions.This is how it turned out:
I only had to use my seam ripper one time :). It was a great first project for beginners. Here is a quick picture of my sewing station! Seems like the perfect nook to be creative and I don't have to put my sewing machine away after each project.

I have "pinned" a few more sewing projects and I currently have another project in the works that I will post about next week!  You can check out my inspiration and other tutorials via my "Sewing Projects" board on Pinterest! 

With Love,
Katie M.

Sunday, January 6, 2013

All in the Name:


I never really explained how "Southern Refresh" came to be, and the start of the new year seems like the perfect time to explain:

Southern: The majority of my life has been spent in the South; it is my comfort zone, my style, my life. The way of life in the South, is the life I love. People are friendly, hospitable, and God centered, Saturdays are reserved for college football and Sundays are for God and good cooking. What could be better?

So that part of the name was easy, but then what to put with Southern? A lot of my first thoughts were already taken, so I began to think outside the box and the word "Refresh" came to mind. I immediately looked up the word and this is what the Webster dictionary said:

Refreshto restore strength and animation to : revive; to freshen up : renovate; to restore or maintain by renewing supply : replenish.


It was perfect! I love to revive old fashions (see here), I am always renovating my home, and I am always seeking replenish my soul through God, friends, and family.

Put the two together and so began Southern Refresh; it is the perfect blog name for me!  To those who read this blog,  I hope you enjoy reading Southern Refresh as much as I like writing it. 


Happy Sunday! 

PS- We had a great weekend with one of my best friends and can't wait to share this week! 


With Love, 
Katie M. 

Wednesday, January 2, 2013

End of a Season, Beginning of a Year:

It was a bitter sweet start to 2013: with a Nole victory at the 2013 Orange Bowl, so too came the closing of the 2012 football season. Hopefully the new year will be full of hope, opportunity, and new adventures to be had! And maybe a National Championship next season? 

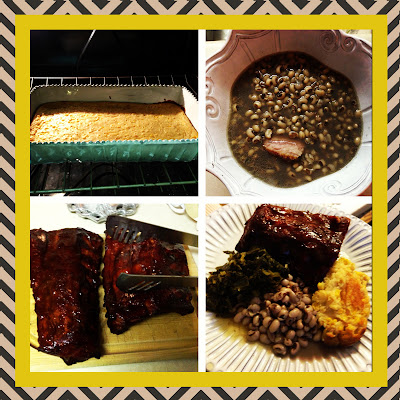
In honor of game day and the new year we planned a traditional southern New Year's feast, with a bit of a football theme.
On the Menu: 
Corn Casserole
Lucky Black Eye Peas
Smoked Ribs
Collard Greens
Yum.

And of course a southern meal wouldn't be complete with out a tablescape. 
The Seminole table:

Again, I used what I had around the house for the table setting (if you do your wedding right, you really do get a lot of good pieces). My mom made the burlap runners for each table at the wedding and we used the garnet & gold shakers for our wedding"exit."  The mints and napkins used were leftovers from tailgates this season, and the Bobby Bowden signed football was a gift Phillip received.  Oh, and of course I had to add the oranges in honor of the "Orange Bowl". 

Below is the corn casserole recipe (via Paula Deen). All you have to do is mix all the ingredients and pop it in the oven for 45 mins! Easy as can be! 
Ingredients:
  • 1 (15 1/4-ounce) can whole kernel corn, drained
  • 1 (14 3/4-ounce) can cream-style corn
  • 1 (8-ounce) package corn muffin mix (recommended: Jiffy)
  • 1 cup sour cream
  • 1/2 cup (1 stick) butter, melted
  • 1 to 1 1/2 cups shredded Cheddar
Directions:
Preheat oven to 350 degrees F.
In a large bowl, stir together the 2 cans of corn, corn muffin mix, sour cream, and melted butter. Pour into a greased 9 by 13-inch casserole dish. Bake for 45 minutes, or until golden brown. Remove from oven and top with Cheddar. Return to oven for 5 to 10 minutes, or until cheese is melted. Let stand for at least 5 minutes and then serve warm.

Note: We actually decided not to add the cheese, used low sodium corn, and substituted regular sour cream with light sour cream. Have to save calories where you can! 


Go Noles,
Katie M. 

Tuesday, January 1, 2013

2013:

Happy New Year! Hope 2012 was a blessed year for you and yours! Here are my resolutions/goals for 2013. What are yours?

Cheers,
Katie M.